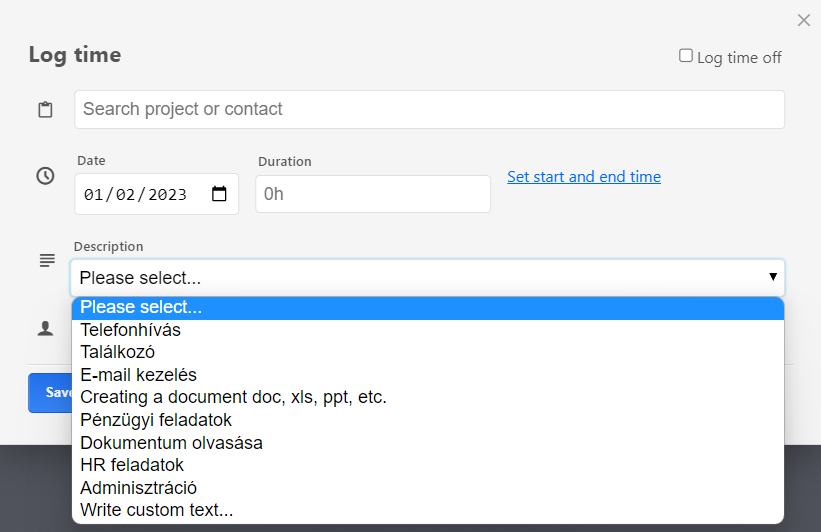
Filling in the Log time form
In the "Log time" form, the first thing to do is to enter the relevant partner or project - if the recording was not started from the CRM/Projects view or from a related module. Enter the first few characters of the contact or project name and the system will automatically display the data already recorded, from which you can select the one you want to use.
When recording, it is important to specify the date on which the task was carried out and its duration. However, it is also possible not to enter the total duration but the start and end dates. In this case, the system will automatically calculate the time to be recorded.
In the Description field, a drop-down list can be used to select a template description of the activity performed. It is also possible to enter your own custom text by selecting the option "Write custom text...". A text box will then appear where you can enter any text you wish.
The descriptions in the drop-down box can be customized. The customization option will be detailed later in the Settings section of the module.

It is also possible to record time spent on behalf of others. In this case, the "Record on behalf of another user" option must be ticked after the activity description. All users of the account will then be displayed in a drop-down list, where you can choose in whose name the time is to be recorded. This option will only appear if it is enabled in the Settings and the user doing the recording has Project Admin, Controller, or Super Admin privileges.
The time spent is recorded in this way under the name of the selected user, but the name of the person who recorded it is also shown in the logged data.
Attention! It is also possible to record working time for a future date - e.g. for a planned time shift. How much time can be recorded in advance can be controlled in the module's Settings.
In the views of the module, if there is a day in the given week for the user/project/partner where no entry has been made yet, the data is displayed on a white background and the text 0h is displayed. Where there are already recorded working hours, the number of hours and minutes recorded will be displayed. If an entry has already been approved by the approving supervisor on a given day, the cell is highlighted in yellow. If all the working time entries have been approved, the cells will be displayed with a green background colour. The colour coding helps both the recording user and the approver to find their way around.
